Boost Your Signal, Extend Your Reach!
Discover Seamless Connectivity with TP-Link Repeater.
Overview to Log into your TP-Link Repeater using tplinkrepeater.net | Tplinkrepeater.net Login
- At firsts link the tplinkrepeater net
- After that, switch on your TP-Link repeater and link to a WiFi network.
- Following that, activate a web browser.
- And then, On the device that’s coupled to the TP-Link repeater
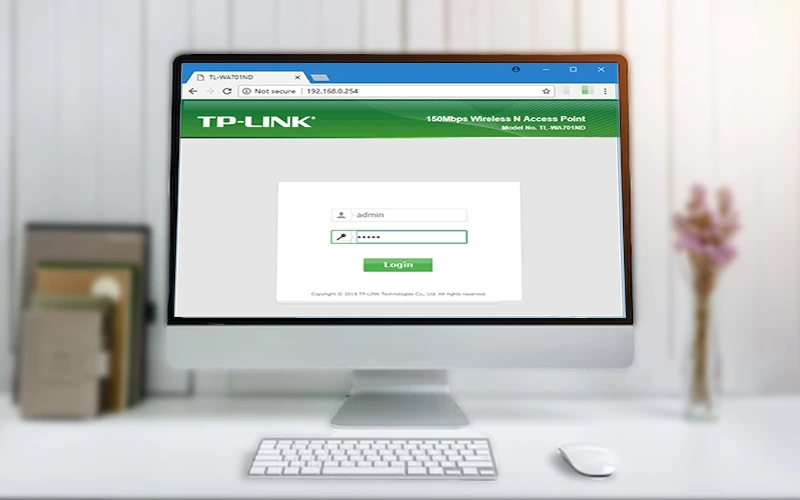
- Enter the normal internet search terms here.
- Proceed to input your TP-Link’s default IP address.
- 192.168.0.254 and 192.168.1.1 are the usual default IP addresses from this point forward.
- After that, you should get a window asking for your login details.
- The default value for both the username as well as the password is frequently “admin.”
- Likewise, press the “Submit” or “Login” button after providing these details.
- Here, you can change an extensive number of settings, among them those related to wireless networks and security.
- Look through the menu selections to find the configuration settings you want to adjust.
- Remember to save your alterations if needed.
- It’s a good idea to log out of the administration interface after making the modifications that are required to secure the configuration.
- Check the user interface for a “Logout” or similar function.
Information Requires for tplinkrepeater login
The information that is needed for the reliable Tplinkrepeater login is mentioned below:
- First, connect your gadgets collectively.
- Open the browser and click the link.
- To find IP addresses, use the tool IP Discover or input tplinkrepeater.net into the browser's finding bar.
- You'll be presented with the TP-Link repeater login screen.
- Next, provide your username and password.
- Finally, select "Login" to set up your network configuration and access the repeater's parameters.
How to Log In To The TP-Link Repeater
- Initially, connect your computer or mobile device to the Wi-Fi network (TP-Link_Extender, for instance) on the TP-Link repeater sign-in page.
- Unveil the browser and pass in the IP address for the TP-Link extender login, which is usually http. tplinkrepeater.net, in the browser’s search box.
- Next, as a backup, you can use the extender’s IP address or its default domain name, http. tplinkrepeater.net
- Upon logging in to Tplinkrepeater.net login page, you can now effectively control your network, view the extender’s settings, and modify the Wi-Fi settings.
How do I enable WPS on my TP-Link wireless extender?
- Before anything else, make sure your Tp Link WiFi extender is turned on and placed just across from your modern router.
- Continue holding until the gadget connects. Check out www.tp link repeater.net if the issue still exists.
- Following that, the WiFi LED on the tplink extender becomes solid.
- After that, link using the Tplinkrepeater.net login authorizations.
- At this point, your Tplinkrepeater.net login configuration has been successfully finished.
Tplinkrepeater.net login using the tp-link setup wizard
Establish a wireless or hardwired network connection and connect the gadget to the power supply. If the network is wireless, you must locate the SSID of the extender and input the wifi password. These details are on the label of the gadget. But for a hard-wired connection, you’ll need an Ethernet cable.
Use whichever browser you like to perform the tplink extender login. But make sure that nothing is broken and that it’s all current. You must type http.tplinkrepeater.net into the browser’s address bar. Alternatively, you can enter the IP address 192.168.0.254 to reach the Tplinkrepeater.net login page.
How to use the Tether App for Tplinkrepeater net login
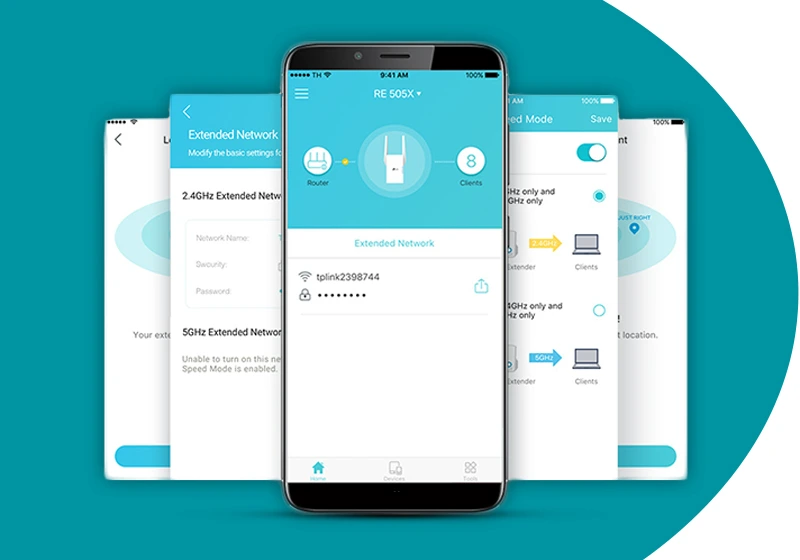
- In the first step validate that tplinkrepeater must be placed next to the router.
- Next, download the tplinkrepeater app from the manufacturer’s Application Store on a phone or tablet.
- Next, connect the device to the newly created tplink Extender login name in the WiFi list once the application has been downloaded.
- On the same note, open the Tether app right now and tap the newly discovered extender device on the phone’s display.
- The application then asks for a password for the principal network that you want to expand after identifying it.
- If the Tp Link Extender login supports dual bands, or both 5G and 2G, the Tether program will proceed to create a new connection with each network one at a time.
- The last step is to create unique passwords and extended network names.
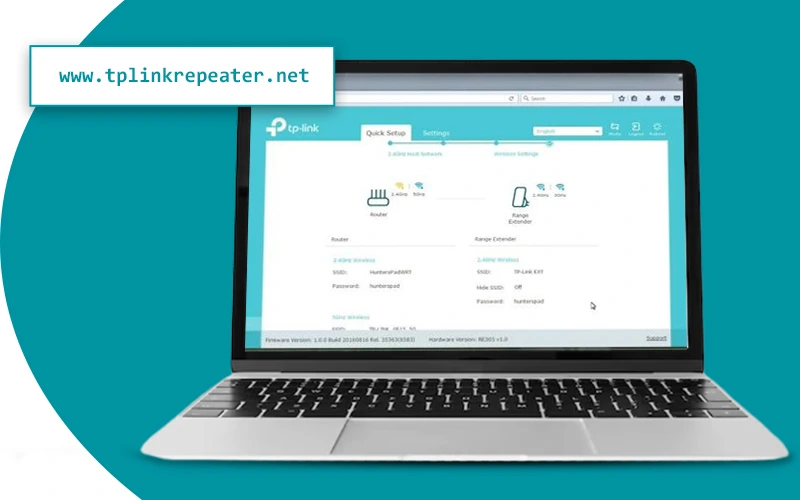
Instructions to connect tplinkrepeater to the router by using www.tplinkrepeater.net
- First, take the following actions to create an expanded network using tplinkrepeater.net or tplinkextender.net:
- Link your PC to the network using the default SSID once your TPLink repeater has been positioned.
- Open a web browser and navigate to the Tplinkrepeater.net login page.
- By providing the default username and password on the login pop-up, you may now access the TP Link repeater admin settings and extend your home network.
- Next, choose the 2.4 GHz and 5 GHz networks on your household router, and then input your wireless password.
- Finally, to complete the setup, click “Save,” create a new password, and give your expanded network a name.
Guidance to Fix tplinkrepeater Login Issues
Resetting the device to default settings is an additional troubleshooting step you can take if you are not able to admittance to the tplink extender login page at http.tplinkrepeater.net Your tplink repeater login problems will be solved by doing this.
- To force a hard reset on your tp-link device, follow the instructions below:
- After connecting your TP-Link extender to a power source, watch for a steady flashing power light.
- Hold down the keyhole until the power light stops blinking, which may take some time.
- The TP-Link gadget will restart to its original settings when the reset keyhole is released.
Change Tplinkrepeater Login Credentials by using the tplinkrepeater net login page
- Navigate to the administration dashboard; instructions are provided in the preceding section.
- When you are on the TP-Link Extender WiFi Setup page, tap on the “Settings” menu option from the upper left menu.
- Under the “Main WiFi Network” section, find the Password field.
- Replace the old password in the designated WiFi password field.
- Hit “Apply.”
- It appears that you have modified the password for; nevertheless, to access all of your devices, you must enter the new password.
How to Reset tp link wireless extender through tp link extender login page
Tp-Link extender reset using tplinkrepeater.net
- Establish a wireless network connection between your PC and the Tp-link extender
- Enter the login credentials on tplinkrepeater.net.
- Log in now with the password and username.
- You will then see the TpLink extender dashboard after clicking Log in.
- Make sure you select the Factory Defaults option after selecting the System Tools.
- Click Restore when finished. The process of returning your Tp-Link wifi extender to its original factory settings will commence.
- Your extender’s initial settings will take a few minutes to return to normal.
- For the new modifications to take effect, the device will now automatically reboot.
Update the Firmware of tp-link repeater with the following steps:
- Download the most recent firmware update from the website www.tplinkrepeater.net for your TP-Link router. Open your router's web interface and log in to http.tplinkrepeater.net. Open your browser and type the IP address 192.168.0.254 to accomplish this.
- Click the System Tools tab and choose Firmware Upgrade from the online interface.
- To start the upgrade process, click "Upgrade."
- At this point, your router will update its firmware automatically. Throughout this procedure, avoid turning off or resetting the router.
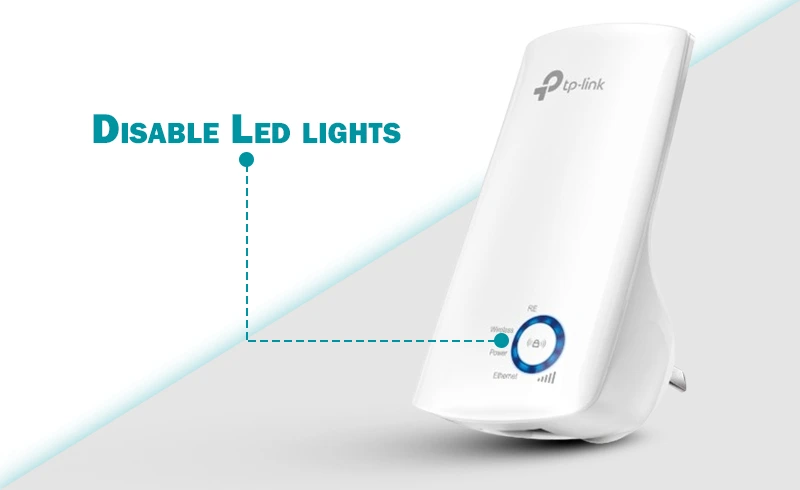
How to disable the LED lights by using the tplinkrepeater.net login page
If your TP-Link extender setup light is blinking, there are several things you might interpret from it. Therefore, let’s examine what that might be. We would like to inform you in advance that the red light on your TP-Link extender is blinking, and this is not a good sign. You alone can solve the problem, so it’s not so horrible.
- If you operate at night and would like to disable the LED lights on the front panel of your repeater, you can easily alter the settings by completing the following:
- Start by logging on to tplinkextender.net via the tplinkrepeater.net login page.
- Alternatively, utilize your browser’s built-in IP discovery feature to access the tp link login page.
- Then, use the “Settings Menu” to access “System Tools.”
- From now on, “LED Control” will be visible under this area.
- Afterward, choose “Night Mode” > “LED Off Time” (where the time restriction can be adjusted).
- This means that the LED lights will be off for the length of time that you specified in the preceding step.
- To use the dark mode, finally click “Save Settings.”
Conclusion:
FAQs
Be certain that your device is connected to the TP-Link repeater’s Wi-Fi network if tplinkrepeater.net is not connecting. Check for browser difficulties, restart the repeater, and confirm that the web discovering or IP is accurate. See the user manual or get help from TP-Link support if the issue continues.
Be certain that your device is linked to the TP-Link repeater’s WiFi if you are having trouble accessing tplinkrepeater.net. Try using a different browser, restarting the repeater, and substantiating that the web discovering or IP is correct. Substantiate that no antivirus or firewall is preventing access. For more help, see the user manual or get in touch with TP-Link support.
Be certain that the TP-Link repeater is linked to its WiFi if it isn’t functioning. Substantiate the IP discovering or web discovering, restart the repeater, and look for any browser-related problems. Should issues continue, refer to the user manual, carry out a factory reset, or get in touch with TP-Link support for help.
Using the web URL or IP, enter the web interface, log in using the default credentials, navigate to the wireless settings, change the SSID, and save the changes. You may also modify the wireless name (SSID) on http tplinkrepeater net. Reconnect devices to the newly renamed Wi-Fi network.